There was a time when phone camera software, that allowed taking pictures, had just one or two options. But as the hardware responsible for taking pictures improved so did the software behind it. These days you can adjust practically every parameter of the shot before you take it, similar to the way you can on a proper camera. From things like white balance and exposure to ISO, shutter speed, metering modes and much more.
For the layman, these terms can be quite daunting and thus most people don’t seem to bother with them and just choose to point and shoot. But while this may give decent results most times, you’d be surprised how much better you can make your shot if you just spend some time adjusting a few settings.
Here, in this multi-part series, we will be taking a look at some of the settings you commonly find on phones and how you can use them to get the most out of your photos.
Resolution
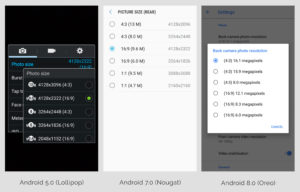
One of the most basic settings is the option to change the camera resolution. This essentially lets you control the number of pixels in your captured image, with the highest option being whatever is the maximum resolution the sensor supports along with a few lower resolution options.
As some of you may know, the resolution is measured in pixels. Because there is usually a lot of them, they are grouped together in a bunch of million pixels and called a megapixel. A common resolution these days is 8 megapixel, which means the sensor is capable of capturing 8 million pixels at once.
So how important is resolution and how important are megapixels? A lot and at the same time, not so much. A higher resolution image can have more detail, provided it is captured natively and not just an upscaled version of a low-resolution image, in which case the resolution will increase but the amount of detail will remain the same. So on a technical level, yes an 8-megapixel image is better than a 5-megapixel image. But it’s rarely that simple.
Often, as it happens, some sacrifices have to be made to achieve a higher resolution image. The ideal thing to do would be to keep the size of the pixels on the sensor the same and just add more pixels every time you wanted to increase its resolution. But this would also increase the physical size of the sensor, which is not ideal, especially on a smartphone, where space is at a premium. So often, the sensor size is kept mostly the same while increasing the resolution, which results in smaller pixels. Think of this as cutting a pizza into eight slices instead of six. It’s the same size pizza so even though you are getting more slices, the individual slices now smaller.
What happens when the pixels on the sensor are smaller? They are able to capture less light, which results in grainier images in low light situations as the camera has to use a higher ISO rating (more on this later) to compensate. So as you can see, the higher detail comes at the cost of worse low light performance, compared to a sensor of the same size but with a lower resolution. Of course, as technology progresses and we get better sensors on our phones, we are now able to cram in more pixels and yet achieve good light sensitivity per pixel. This is why some companies have achieved ridiculous resolutions like 41 megapixels without compromising much on low light performance.
Buyer Tip: If you are planning for an entry-level or mid-range smartphone, select the one which has a better sensor and lens. Never buy a smartphone just for its Megapixel resolution.
So what setting should you choose on your phone while shooting? Ideally, the highest one. These days some companies will set the resolution to a lower option than what is the sensor’s maximum resolution. This option usually has a 16:9 aspect ratio designed to fill your smartphone’s widescreen display in landscape mode but this is achieved by cropping the top and bottom of the image off (since the sensor is usually not 16:9 itself but rather 4:3) and thus you get a lower resolution. You can change this by going into the settings and selecting the maximum! resolution option. The image will now be squarer but you will get more pixels and if required you can always crop it later through the gallery application.

The iOS native camera app does not allow a resolution adjustment for photos and always shoots in full resolution. But there are a few third-party apps that have the option to tweak the resolution to up to some extent.
The lower resolution options can come in handy when you’re short on space and need to take some photos anyway. The better thing to do, however, is to delete some data and then take pictures at maximum resolution.